Showing posts with label summer seasonal. Show all posts

Tuesday, July 13, 2010

Taiwanese Local Eats: Cold Noodle!


Per request of a very monstrous (but harmless and adorable) creature with noodle on the back, I'm posting this not-very-Berlin-way vegan recipe...

This summer is indeed a hot summer!  It roared up to 38°C yesterday, good thing that I saw clouds drifting over to rescue my apartment, which is situated on the top of the apartment floor, making the ceiling heat up in the scorching sunlight and radiating me in the night like a human-oven.

Chinese eat a lot of different types of noodle, not just differ in thickness, but in the type of floor it is made of, amount of oil, freshly made (damp noodle) and dried, and of course, the way of indulging them (eating it cold or hot, eating it in soup or dried, eating it with sauce or with garnish only, sauté in hot pan...)

Taiwan has this local specialty of noodle that's called 油麵 (literal translation would be "oil noodle").  The noodle it self doesn't seem that much different from other types of noodle, except it looks round, not too thin (about 2 mm) and has a faint hint of yellow.  It is made WITHOUT OIL.  It is made with high gluten wheat flour, which gives it the texture of smooth and chewiness, and the noodle doesn't stick to each other as easily. This is the real reason why it is called oil noodle, not because it is made of oil, but the high gluten wheat flour that gives it the characteristics of not sticking together.
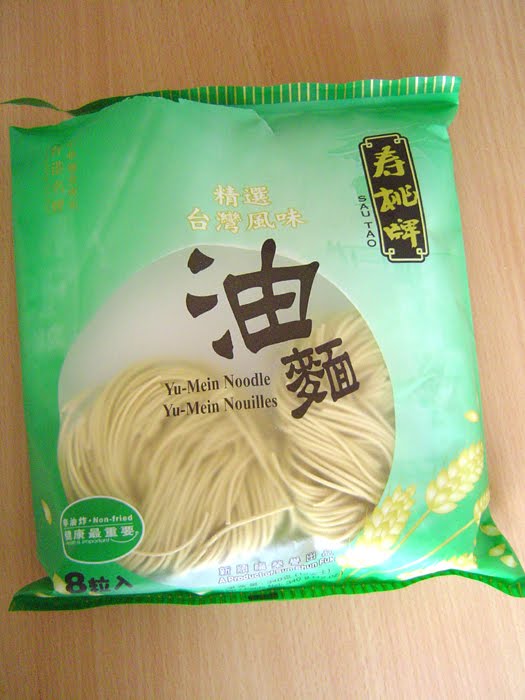
Taiwan yu-mien (oil noodle) by a Hong Kong-nese noodle company

Being in Berlin, I could find all the ingredients in an Asian supermarket chain called "Amazing Oriental" on Kanstraße opened up by Hong Kong-nese, originated from the Netherlands:

Kantstraße 101, 10627 Berlin

I don't think you can get all the ingredients in other Asian markets in Berlin, because other markets are opened by Vietnamese-Chinese (they are mainly Cantonese), Thai or perhaps Korean, and these ingredients are too real Asian to be sold else where.


Usually this type of noodle is sold fresh, meaning it is freshly made and without drying process, sold in traditional markets in Taiwan.  But now that I've left Taiwan for so long and now in a country without too much connection to Taiwan, I could only find dried ones from Hong Kong.  The label says: "Taiwan oil noodle" but I read the company information, it is a Hong Kong company.  (disappointed)

This noodle is used for making 台式涼麵 tai-shi liang-mien (literal translated to "Taiwan cold noodle"), I assure you, it tastes different with other types of noodle.

The sauce is basically made with:
BLACK sesame paste (Middle Eastern and Westerners only know of the white sesame)
peanut butter
黑醋 hei-tsu (or hei1 cu4, literal translated to "BLACK vinegar," I only know of Taiwan people use this)
米醋 mi-tsu (or mi2 cu4, literal translated to "rice vinegar," Chinese, Korean and Japanese all use this, other vinegars don't have a "zing" like rice vinegar does, try it, you'd know what I'm talkin' about!)
soy sauce
sugar
sesame oil

The tricky part is getting this ratio exactly right to make your sauce for the tai-shi liang-mien.

The pure black sesame paste, rice vinegar, organic soy sauce and sesame oil

When you get sesame oil, try to get the ones from Taiwan, Japan or Korea, these origins produce their own sesame seeds for the oil.  I've tried one from Hong Kong, it really didn't have the "zing" in the sesame oil and isn't as aromatic as the others.

Tai-Shi Liang-Mien Jiang (or "Taiwan Cold Noodle Sauce")
Preparation time:  10 - 15 minutes
Cooling time:  5 - 20 minutes (depends how you cool you want it)
Yield:  2 - 3 servings
(I've written the recipe in perspective to "tablespoons," so you can just take the ratio to make smaller or larger quantities)

Metrics Measurements U.S. Measurements Ingredients
15 mL 1 tablespoon black sesame paste
7.5 mL ½ tablespoon plain peanut butter
60 - 75 mL 4 - 5 tablespoons warm water (about 60°C)
7.5 mL ½ tablespoon brown sugar
30 mL 2 tablespoons rice vinegar
15 mL 1 tablespoon black vinegar (if you don't have it, replace it with adding rice vinegar instead)
15 mL 1 tablespoon soy sauce
15 mL 1 tablespoon sesame oil

Direction:
1.  Scoop out the black sesame paste and peanut butter in a bowl.
2.  Heat and add the warm water.  It's very important that it is warm, because cold water doesn't do the magic of thinning the sauce to a very runny state without clumps.
3.  Mix in sugar, rice vinegar, black vinegar, soy sauce and sesame oil and mix the sauce well.
4.  You can have it in room temperature or pop it into the refrigerator to cool it down a bit.

The process of , making the sauce smooth by adding WARM water
After mixing, the consistency is smooth and no clumps

Tai-Shi Liang-Mien (or "Taiwan Cold Noodle")
Preparation time:  about 10 minutes
Cooling time:  5 - 20 minutes (depends how you cool it)
Yield:  2 - 3 servings

Metrics Measurements U.S. Measurements Ingredients
2 servings 1 ball (or 2 servings) tai-shi yu-mien (or "Taiwan oil noodle")
7.5 - 15 mL ½ - 1 teaspoon vegetable oil
(4 - 8 cubes) (ice cubes, an option for cooling)
60 mL ½ cup fresh cucumbers, in finely cut strips (about ¼ of a normal long cucumbers with shiny skin that are sold in Berlin)
60 mL ½ cup carrots, in finely cut strips (about 2 medium sized carrots)

Direction:
1.  Boil about ½ liter of water for cooking noodle. (Do not add salt in the boiling water, most East Asian noodles are made WITH salt added, and adding salt would over salt the noodle.)
2.  Drop one ball of noodle (or 2 servings, the noodle size will double after boiling) in the boiling water and turn the heat down to medium or low in a simmer.
3.  Stir gently and check the noodle.  After about 5 minutes, you will see the transparency of the noodle only on the outside, this is very noticeable.  After about 7 - 10 minutes, you will see the whole noodle having much more consistent color (faint translucent all across the noodle width), if this happens and if 10 minutes is up, the noodle is finished cooking and turn off the heat.
4.  Rinse the noodle in cold water until it is at the same temperature as the cold water.  (At this stage, you'd notice that once the cold water hits the noodle, the noodle isn't translucent anymore and becomes darker in color.)
5.  Drain the noodle out lightly, try avoiding water and pour about 3 drops of oil onto the the noodle and mix the oil into the noodle.
6.  Further cool the noodle down.  If you have ice cube, you can just put it on the side of the noodle and serve it, but if you want to cool it in the refrigerator, it takes about 20 minutes.
7.  Garnish the noodle with a lot of finely chopped cucumber strips and carrot strips!
8.  Drizzle the sauce on right before eating and slurp!
The noodle is also popular to eat with some cooled fermented vegetables or pickles on the side.

The translucency is only on the outer side of the noodle cross-section, not yet finished cooking


Mostly translucent in the noodle cross-section, finished cooking

This is a noodle once get me started on eating, I'd not know when to stop.  It has a nice vinegary taste, a bit sweet and salty, and it is cold and slippery in your mouth and chewy on your teeth!

Tuesday, July 6, 2010

A German Must: Cucumber Pickles!


Bavaria harvests half of Germany's cucumbers.  What do I mean by saying this?  CUCUMBER SEASON IS HERE!!!

Summer is cucumber season in Germany.  It starts around mid-June.  This is the time to get the freshest, crunchiest and weirdest-looking cucumbers!!  You can have varieties of choice when you choose them.  Small ones, big ones, curly ones, bent ones, alien-looking ones, big head with a small body ones...  Oh, I can't name them all!

A few tips for picking the freshest cucumbers:
-  Put slight pressure on a cucumber between your fingers, if it feels a bit soft, they've lost water, which means they are not as fresh.  Although harder ones doesn't necessarily mean it's fresh, but at least you can avoid those that have lost water.
-  Weigh the cucumbers on your hand up and down to feel the density.  A tasty cucumber is the ones that are young and dense, if it feels light, it means there are air in the center and the cucumber is a bit old.

Washed cucumbers waiting for me to pickle...  "Pickle me first!! Pickle me first!!" they shouted excitedly

With all these cucumbers, you can make lots of pickles for the summer and even for the whole rest of the year till the next cucumber season!

Spreewald is one of the most infamous area in Germany where pickles are made.  Don't get too excited, I don't have exclusive access to their local cucumber pickle secret recipes...  BUT I can offer a cucumber pickle recipe that comes close.

The pickling spices in the jar, waiting for the cucumbers to be packed in

Cucumber Pickles
Preparation time:  20 - 25 minutes
Jarring time:  1 week in the jar before eating
Yield:  7 - 8 pickles (or 0.5-liter of pickles)

Metrics Measurements
U.S. Measurements Ingredients
0.5 L 17 fl. oz air-tight glass jar
7 - 8 medium, normal sized and well-washed pickling cucumbers
(about 7 cm long and 2 cm in diameter)
165 mL ¾ cup5%-acidity apple cider vinegar (or wine vinegar) (Apfelessig oder Brantweinessig)
165 mL ¾ cupwater
30 mL (or 25g)2 tbsps brown sugar
30 mL2 tbsps mustard seeds (Senfkorn)
25 mL1½ tbsp caraway seeds (Kümmel) or parsley seeds
3 - 4 bay leaves (Lorbeerblatt)
15 mL½ tbsp whole cloves seeds (Nelke)
15 mL½ tbsp peppercorns (Pfefferkorn)
3 - 4 stems of fresh dill (dill with flowers has more flavor)

Direction:
1.  Prepare a 0.5-liter jar.  Wash and dry the jar.
2.  Put the pickling spices (mustard seeds, caraway seeds, 3 - 4 bay leaves, cloves, peppercorns and fresh dill) into the jar.  You can just lay the dill into it with a bent or you can cut the dill in half. (Don't forget to wash the fresh dill before putting it in.)
3.  Wash the cucumbers well!  Cucumbers are grown touching the ground, so it has a lot of sand and dirt on it.
4.  Gently pack the cucumbers into the jar.  Make sure they are not pressured into the jar.  Let them nicely touching each other without forced in.  This way, the pickle would come out more crunchy and won't be soggy.
5.  Boil water, vinegar and sugar together, this is the brine for the pickles. Once it starts to boil, pour it into the jar and cap it.  Place the jar in a cool and dark area for a week.  In a dark and cool area, it can store up to a year (so I heard), but please please put them in the fridge after opening the jar!

The cucumbers will look freshly green the first 3 to 4 hours, but it'll gradually turn cucumber-pickle green.  The part of the cucumber that touches the wall of the jar will turn the color a bit later, but don't worry about it, after a week, all the cucumbers will look the same.

The pickles that comes out has a very nice dill taste, they are crunchy, a bit sour with a hint of sweetness.  If you indulge a bit further, you'd taste the faint clove taste!  They are really not what you can get commercially in the supermarket!  They have much more flavors!  Try making this, you'd be so delighted that you'd even be pickling in your dreams!

When I first made the cucumber pickles, there was too much brine.  What to do?  Hehehe...  I had some organic carrots and an abundance of caraway seeds so I made CARROT PICKLES!  :]

Pickled Carrots
Preparation time:  10 - 15 minutes
Jarring time:  1 week in the jar before eating
Yield:  3 - 4 small to medium pickled carrots (or 0.25-liter of pickles)

Metrics Measurements
U.S. Measurements Ingredients
0.25 L 8 - 10 fl. oz air-tight glass jar
3 - 4 small to medium sized and well-washed carrots
(about 9 - 12 cm long and up to 2 cm in diameter)
82.5 mL ⅓ cup and a bit more5%-acidity apple cider vinegar (or wine vinegar) (Apfelessig oder Brantweinessig)
82.5 mL⅓ cup and a bit morewater
15 mL (or 13g)1 tbsps brown sugar
30 mL2 tbsps caraway seeds (Kümmel)

Direction:
1.  Prepare a 0.25-liter jar.  Wash and dry it.
2.  Put the caraway seeds into the jar.
3.  Wash the carrots well.  You don't want to pickle the dirt on the carrots.  Also, preferably using organic carrots, that way you know you are eating little to no pesticides.
4.  Pack the washed carrots into the jar, if some of them are too long, just cut them so they can fit.
5.  Boil the vinegar, water and sugar together to make the brine.  Once it's boiled, pour it into the jar and cap it.  Wait a week before opening the jar to eat.

The pickled carrots has slight caraway seeds, very crunchy and fresh tasting.  Not at all soggy and soft!  One of the greatest summer side dish and snacking delight in my opinion!

Pickled cucumbers and carrots after one day

Blueberry Season!!! Muffin, Anyone?


It's summer time!  Blueberries are beginning to come out in the markets.
"Hmmm...  blueberries?" you asked.  Yes, blueberries indeed.  Blueberries in vast of Germany in the summer are from local source (from Germany!), which makes it a great reason to eat them by the handful!

I have to admit that in this recipe, banana is not from local source, although they are organic.

Besides eating the nutritious blueberry goodies by the handful, you can also make delicious vegan muffins with them!  This recipe came from my blueberry-loving friend, "Soberry", who got ahold this recipe from, yet, another friend.

Baking muffins are cracking up (I wonder what they are laughing about...)

These conveniently sized muffins are great to bring with you on a picnic trip with friends, as bicycle ride snacks, comfort food, onto the U-Bahn and S-bahn to give away to the poor homeless people, to a party or a lakeside/river bank eat out!  The possibilities are endless!

Blueberry-Banana Muffin
Preparation time:  20 minutes
Baking time:  20 - 25 minutes
Yield:  about 1 dozen


Metrics Measurements
U.S. MeasurementsIngredients
475 mL (240g) 2 cups all-purpose flour
(wheat, of course, I used Typ 405, Typ 550 works fine also)
15 mL 1 tbsp baking powder
2.5 mL (1.3g) ½ tsp cinnamon
2.5 mL (1.3g) ½ tsp ground ginger
2.5 mL (5 g) ½ tsp salt
180 mL (150 g) ¾ cup brown sugar
5 mL 1 tsp vanilla extract or vanilla sugar


1 large ripe banana
136.5 mL (121.5g) ½ cup vegetable oil
30 mL (45g) 2 tbsp golden syrup (or agave molasses, maple syrup, sugar beet syrup)
205 mL ¾ cup soy milk
273 mL 1 cup fresh or frozen blueberries
(I prefer using frozen ones, they don't pop as easily while stirring and baking)

Direction:
1.  Preheat oven to 190°C (375°F).
2.  Lightly oil 12 muffin tin tray OR simply place the paper muffin liners in the muffin tin tray cups.
3.  In a bowl, stir together the flour, baking powder, cinnamon, ground ginger, salt, sugar and vanilla.
4.  Add the mushed banana, vegetable oil, syrup and soy milk into the bowl.  Stir the batter together well.
5.  When the batter is mixed well together, fold the blueberries (frozen work the best) into the batter.
6.  Carefully pour the batter into each muffin tin tray cup, to about 90% full.
7.  Bake for 20 - 25 minutes, when the top turns light brown.

A bitten blueberry-banana muffin.  You can see the muffin texture inside!

You might be interested in making golden cupcakes, too!
Curious about how to make soy milk yourself?
Related Posts with Thumbnails